Consolidate Duplicate Records
Review People Records to learn about where records are housed in Church Windows.
Duplicate records can occur in many ways, but some common causes include;
-
A member donated in a new way that doesn't match the name in their record. The person entering donation doesn't find a match and enters a new record in order to enter the donation.
-
A name change or nickname end up in two records.
-
There was a typo or misspelling which made the original record difficult to locate.
When this happens, you can end up with information split between their two competing records. Perhaps one has all of their important dates and attendance history, but the other has their giving history. It will also lead to inaccurate counts from reports if a person is listed twice. To correct this, all of the history and information is moved to one record. Then the duplicate gets deleted or archived to prevent future splits.
Choose a Main Record
Choose the record with the most complete and up to date Membership data. Donations and Attendance have simple all in one transfers, but things like dates, comments, and contact information need to be consolidated manually by inputting any missing information into the main record you keep.
To differentiate your duplicates when you Transfer Donations and Transfer Attendance, put a * or other symbol in the records you'll eventually archive or delete.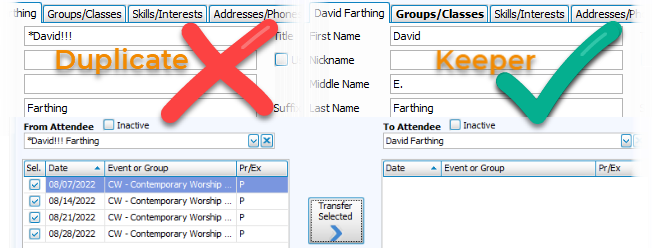
If you'd like, you can compare with an All Information report. In Step 1 - Select Who, identify your duplicates by their Family #. 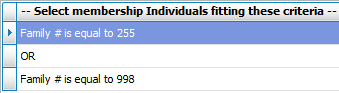
In Step 2 - Layout, deselect other family members.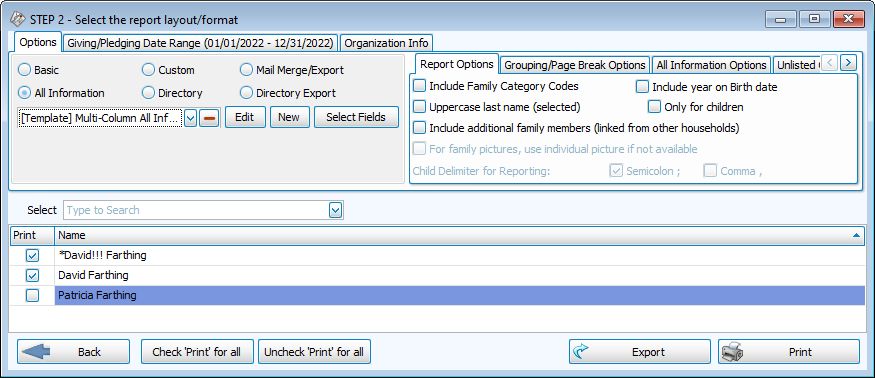
Once you have collected all the relevant data, check the fields for Last Attended Date, Last Visit Date, and Last Giving Date on your duplicate record. These are located in the Individual Record in default fields. Dates here indicate a history that should be transferred to your main record.
Transfer History
-
Transfer Attendance - This procedure takes you through moving attendance from one record to another, ensuring your attendance counts and reports are accurate.
-
Transfer Donations - Follow the instructions for consolidating giving history split between duplicate records. This will ensure that Donation Statements are accurate and the donations are properly credited.
-
Visits will need to be noted or printed in a report and reentered to attach them to the record you're keeping.
Archive/Delete
Make Records Inactive
Records can be hidden and excluded by default with the Inactive check box. This action maintains the entered data, but categorizes the record(s) as Inactive. Inactive names typically appear in red. These need to be purposefully included to appear on labels or reports.
-
Navigate to the record you'd like to archive.
-
Find the Inactive field in the Individual record.

-
Check the box.
-
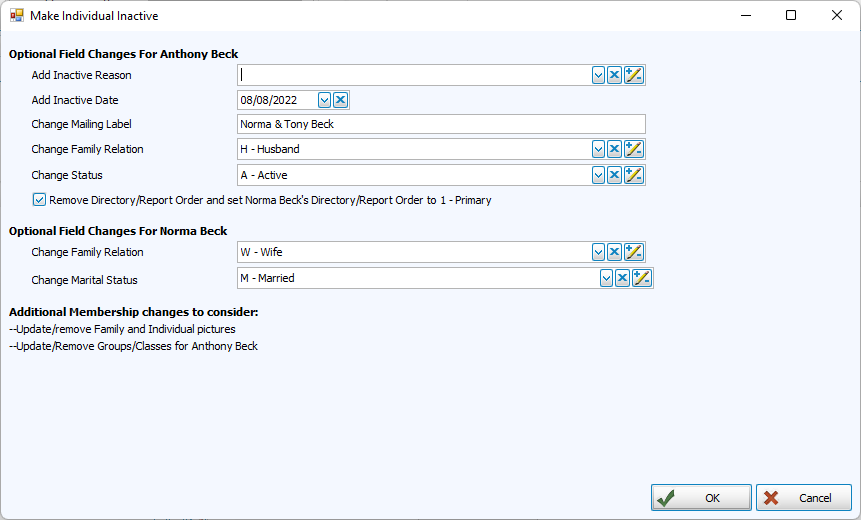
Review Make Individual Inactive edits. This dialog window helps navigate other fields that may be affected. For example, if a member passes away, you'll want to update the mailing label, directory/report orders, and other fields.
-
Optional: Select a reason code and enter the date they became Inactive.
Delete Records
There may be times where a record is no longer needed. This may be because this person did not interact or their information has been duplicated on another record. Deletions are most appropriate when there is no substantial information to save. If a person has Giving or Attendance history, their record cannot be erased. This feature protects your audit trail from informational gaps. In these cases, you should instead Archive the record, rather than delete it.
-
Navigate to the record you'd like to delete
-
Click
 to erase an entire family.
 -
Click
 to erase an individual record, but leave other household members and family record.
 -
Confirm the deletion.
Tips for Preventing Duplicates
-
Before creating a new record in either Membership or Donations, perform a search using the first few characters of the First Name and of the Last Name. Investigate similar or nicknames that could be the same person and compare other information like address to ensure the person you're entering is truly a new person.
-
Donation records will not appear in Membership under People. Manage Givers in Donations shows records from both modules.
-
When you are using the Person Lookup in People, make sure all categories are available and Show Inactive is checked. This helps you find people who might have a prior relationship with the church and have come back.
-
-
Communicate with your team what factors go into determining whether a record should live in Membership or Donations and what Family Category criteria are. See People Records to understand the differences.
-
Periodically run a Duplicate Names Report. You can find this under Reports/Export > Other > Duplicate Names Report.
-
Use Middle Initials in large databases. To avoid confusion with common names, go to Settings and check the box for 'Show Middle Name in Donations/Membership (requires restart).